Building Faster with Nx: A Monorepo Case Study
Explore how adopting a monorepo architecture with Nx can revolutionize your workflow, enhance team collaboration, and accelerate the development of complex projects.
17 octobre 2024
Published
Hugo Mufraggi
Author

A Monorepo Case Study
This article condenses my last five months of searching for the best way to produce a full-stack app in TypeScript. Currently, I’m a tech lead at Invyo, and I’m always looking for ways to improve the process and enhance the developer experience to focus more on the product.
Requirements
I want to create a mono repo with multiple workspaces — some specific to a single project and others shared, such as the frontend/backend contracts or the design system.
I want to implement Storybook to document my design system, make creating new components more accessible, and onboard new developers.
I also want a workspace for all my shared types.
Finally, I need a good CI/CD setup to maintain high quality and provide continuous integration.
Deep Dive into the monorepo
I chose NX as my mono repo technology. It’s not just a package manager; it provides a complete CI/CD solution to speed up builds and releases. For my small project, it may be overkill, but for a professional project, it’s a great tool. If you want to build your Monorepo app with me, you can create an account — it’s free, and no credit card is required: https://nx.dev/pricing.
After creating your account, you need to link your Git repository. I use GitHub, but NX supports 5 or 6 different Git solutions.
Let’s go! Open your terminal, and let’s get started.
npx create-nx-workspace@latest --ci=github
With this command, we will initialize the mono repo. After that, you just need to link your mono repo to a Git repository. The CLI will ask which type of project you want to create along with its configuration. I chose “no framework” for this article and opted for the integrated mono repo setup. Normally, your repository should look like this:
├── README.md
├── nx.json
├── package-lock.json
└── package.json
App Initialization
I chose to initialize a Nuxt app for this article, but you’re free to pick whatever technology you prefer. They have tutorials for each tech stack.
For Nuxt, I’ll be following this guide.
First, I’ll start by installing Nuxt in my workspace.
nx add @nx/nuxt
# and after i can run
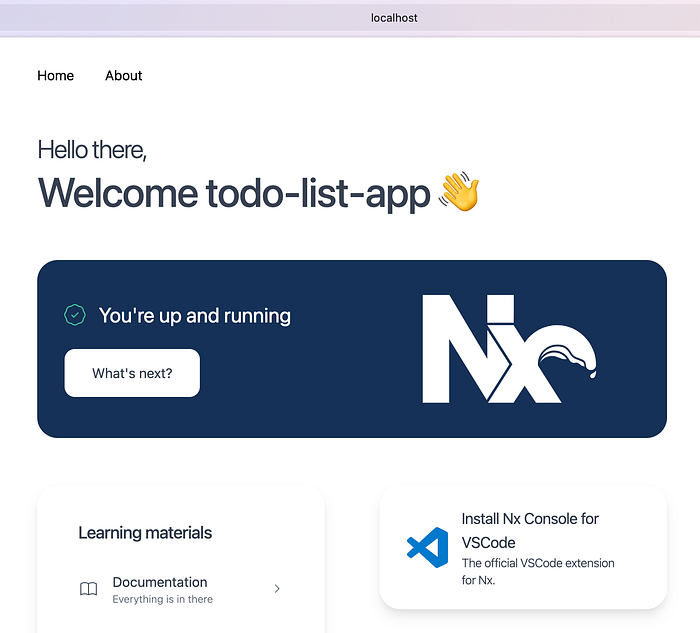
nx g @nx/nuxt:app todo-list-app
Now, your repository should look like this:
├── README.md
├── eslint.config.js
├── nx.json
├── package-lock.json
├── package.json
├── todo-list-app
│   ├── eslint.config.js
│   ├── nuxt.config.ts
│   ├── project.json
│   ├── src
│   │   ├── app.vue
│   │   ├── assets
│   │   │   └── css
│   │   │       └── styles.css
│   │   ├── components
│   │   │   └── NxWelcome.vue
│   │   ├── pages
│   │   │   ├── about.vue
│   │   │   └── index.vue
│   │   ├── public
│   │   │   └── favicon.ico
│   │   └── server
│   │       ├── api
│   │       │   └── greet.ts
│   │       └── tsconfig.json
│   ├── tsconfig.app.json
│   ├── tsconfig.json
│   ├── tsconfig.spec.json
│   └── vitest.config.ts
├── tsconfig.base.json
└── vitest.workspace.ts
You can run your app like this:
nx serve todo-list-app
And test it with this command:
nx test todo-list-app
I created a dummy test in todo-list-app/src/pages/index.test.ts.
import { describe, it, expect } from 'vitest';

describe('NxWelcome', () => {
  it('renders NxWelcome component', () => {
    const isTrue = true
    expect(isTrue).toBe(true);
  });
});
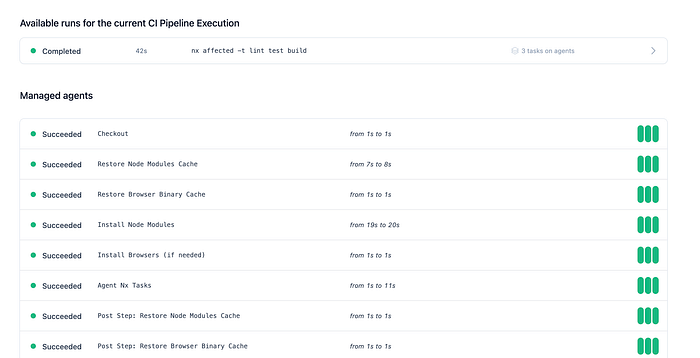
And I pushed. Inside my Nx organization, I can see my different pushes along with the status of the CI/CD.
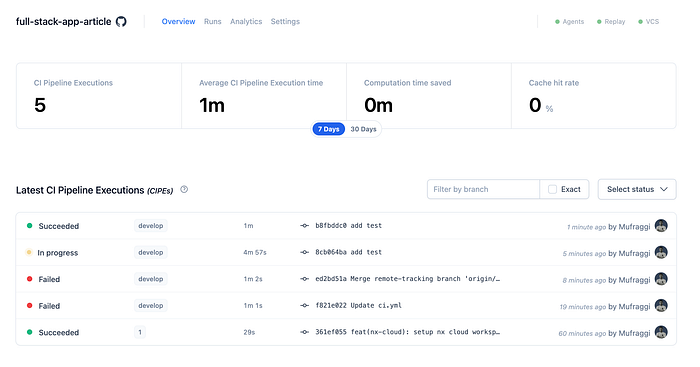
If I click on my last commit run, you can see the details of your CI/CD, including all cache strategies.
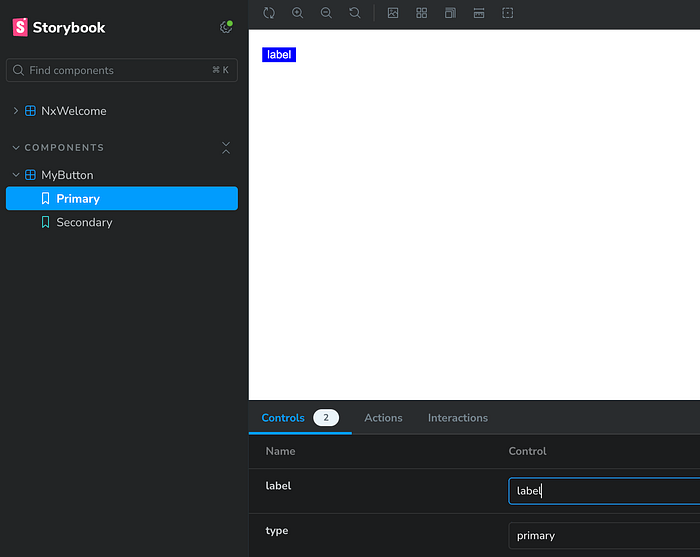
Storybook Init
About Storybook
Storybook is an open-source tool for building and testing UI components in isolation. It allows developers to create, view, and test individual components without running the entire app, improving the development workflow. With Storybook, you can visually organize components, document their states, and ensure they work as expected across different use cases.
Practice
Honestly, I’m not 100% satisfied with what I’ll show you. But that’s life, and it’s not my specialty.
Why am I not happy? I wasn’t able to create a library with my components inside. My first idea was to decouple my component definitions from my project; the goal is to reuse my components across different projects. However, currently, I have my playbook inside my Nuxt project, and I’m satisfied only to some extent.
You can run Storybook like this:
For the moment, I won’t push more changes. Maybe I’ll push more if I need to.
Backend Nest Init
Now, we want to create a backend workspace. I’ll use Nest.js for this example, but you are free to choose whatever you want, as Nx manages multiple frameworks and languages (documentation).
Like with Storybook, we need to add Nest with:
nx add @nx/nest
# after
nx g @nx/nest:app todo-back
With this command, we add a new workspace named todo-back, and it initializes a Nest project inside your app, which, for me, is named todo-back.
We can run it with the following:
nx serve todo-back
I don’t know why, but it threw an error the first time I ran this command. To fix it, delete your package-lock.json and your node_modules folder.
I will add the Swagger configuration later. Inside your backend, you need to update the webpack.config.js file. You need to add the transformer section like this:
transformers: [
        {
          name: '@nestjs/swagger/plugin',
          options: {
            dtoFileNameSuffix: ['.dto.ts', '.entity.ts'],
          },
        },
      ],
Normally, you should have this content in the file.
const { NxAppWebpackPlugin } = require('@nx/webpack/app-plugin');
const { join } = require('path');

module.exports = {
  output: {
    path: join(__dirname, '../dist/todo-back'),
  },
  plugins: [
    new NxAppWebpackPlugin({
      target: 'node',
      compiler: 'tsc',
      main: './src/main.ts',
      tsConfig: './tsconfig.app.json',
      assets: ['./src/assets'],
      optimization: false,
      outputHashing: 'none',
      generatePackageJson: true,
      transformers: [
        {
          name: '@nestjs/swagger/plugin',
          options: {
            dtoFileNameSuffix: ['.dto.ts', '.entity.ts'],
          },
        },
      ],
    }),
  ],
};
We will return inside the Nest project later to create some endpoints for creating and getting todos. But for now, we want to define the contract between the front and back end.
Contract API
My goal with this package is to provide a space for the frontend and backend teams to define the interface contract between the two.
Disclaimer: I’m not completely satisfied with my initial idea of using Zod or another library for type checking. I noticed that with Fastify, packages are available for this purpose, but since I am using Nest, I found some projects that are more or less maintained for using Zod in Nest.
For this example, I’ll use class-validator for defining the contract.
End of the disclaimer.
I have chosen to use a class validator for my input in the create/update endpoints, and I will use Zod to define my output types. It may not be optimal, but it will suffice for the tutorial.
First, we initialize a new package with NX. I chose to use SWC to transpile my TypeScript code.
npx nx g @nx/js:lib libs/api-contract --bundler=swc
I prefer to separate my input and output, so I created two folders for each. After that, I created the definitions for my create input todo, get one todo, and my list todo. I have one file for each schema.
Create Todo
import { IsNotEmpty, IsString, IsOptional } from 'class-validator';
import { ApiProperty } from '@nestjs/swagger';

export const getCreateTodoDto = (ApiPropertySwagger?: typeof ApiProperty) => {
  const ApiPropertyFunction = ApiPropertySwagger || ApiProperty;

  class BaseCreateTodoDto {
    @IsNotEmpty()
    @IsString()
    @ApiPropertyFunction({
      description: "This is required and must be a valid title",
      type: String,
    })
    title!: string;

    @IsOptional()
    @IsString()
    @ApiPropertyFunction({
      description: "Optional description of the todo",
      type: String,
    })
    description?: string;

    @IsOptional()
    @ApiPropertyFunction({
      description: "Optional due date",
      type: String,
    })
    dueDate?: string;
  }

  return BaseCreateTodoDto;
};

export class CreateTodoDtoBack extends getCreateTodoDto(ApiProperty) {}
export class CreateTodoDtoFront extends getCreateTodoDto() {}
Get Todo
import { z } from 'zod';

export const getTodoSchema = z.object({
  id: z.string().uuid().nonempty("ID is required"),
  title: z.string().nonempty("Title is required"),
  description: z.string().optional(),
  dueDate: z.string().optional(),
  status: z.string().optional(),
});

export type GetTodoDto = z.infer<typeof getTodoSchema>;t
List Todo
import { getTodoSchema } from './get-todo';
import { z } from 'zod';

export const listTodoSchema = z.object({
  todos: z.array(getTodoSchema),
  page: z.number().min(1).optional(),
  limit: z.number().min(1).optional(),
  total: z.number().optional(),
});

export type ListTodoDto = z.infer<typeof listTodoSchema>;
You need to expose your different classes and types inside the index.ts of the lib.
export * from "./lib/todo/input/create";
export * from "./lib/todo/input/update";
export * from "./lib/todo/output/get-todo";
export * from "./lib/todo/output/list-todo";
Afterward, you can run this command to build your package:
nx build api-contract
Backend Integration
With Nest.js, we can create a new todo module and define the different endpoints.
import {
  Body,
  Controller,
  Get,
  HttpCode,
  HttpStatus,
  Param,
  ParseIntPipe,
  ParseUUIDPipe,
  Post,
  Query
} from '@nestjs/common';
import { AppService } from './app.service';
import {
  CreateTodoDtoBack,
  GetTodoDto,
  getTodoSchema,
  ListTodoDto
} from '@full-stack-app-article/api-contract';
import { ZodError } from 'zod';

@Controller('todos')
export class AppController {
  todos: GetTodoDto[] = [];

  constructor(private readonly appService: AppService) {}

  @Post()
  @HttpCode(HttpStatus.CREATED)
  async createTodo(
    @Body() createTodoDto: CreateTodoDtoBack,
  ): Promise<{ todoId: string }> {
    const todo = {
      id: (this.todos.length + 1).toString(),
      ...createTodoDto
    } as const satisfies GetTodoDto;

    this.todos.push(todo);

    return {
      todoId: todo.id,
    };
  }

  @Get(':id')
  async getTodo(
    @Param('id', new ParseUUIDPipe()) id: string
  ): Promise<GetTodoDto> {
    const todo = {
      id: id,
      title: 'test',
      description: 'test description',
      dueDate: new Date().getDate().toString(),
      status: 'pending',
    } as const satisfies GetTodoDto;

    // Validate the response with Zod
    try {
      return getTodoSchema.parse(todo); // Validate and return the todo
    } catch (e) {
      if (e instanceof ZodError) {
        throw new Error(`Invalid response format: ${e.message}`);
      }
      throw e;
    }
  }

  // Route to get a list of todos
  @Get()
  async listTodos(
    @Query('page', ParseIntPipe) page = 1,
    @Query('limit', ParseIntPipe) limit = 10
  ): Promise<ListTodoDto> {
    try {
      return {
        todos: this.todos,
        page,
        limit,
        total: this.todos.length,
      } as const satisfies ListTodoDto;
    } catch (e) {
      if (e instanceof ZodError) {
        throw new Error(`Invalid response format: ${e.message}`);
      }
      throw e;
    }
  }
}
Now, you just need to run the following commands:
nx clean todo-back
nx build todo-back
nx serve todo-back
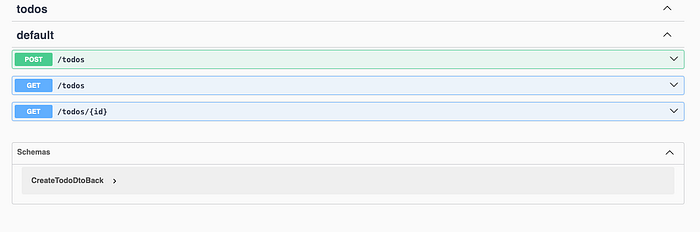
After running these commands, you can find your endpoint definitions at localhost:3000/api.
Nuxt Implementation
Please don’t judge my frontend code; I rushed to finish my articles and aim to show you the possibilities.
The only interesting thing is that I reuse my type definitions from the lib for typing my POST request to create my todo and list my todos.
const fetchTodos = async () => {
  error.value = '';
  try {
    const data = await $fetch<ListTodoDto>(`/api/todos`, {
      method: 'GET',
      baseURL: '<http://localhost:3000>',
      params: { page: page.value, limit: limit.value },
    });
    console.log(data);
    todos.value = data.todos || [];
    total.value = data.total || 0;
  } catch (e) {
    console.error('Error fetching todos:', e);
    error.value = 'Failed to load todos. Please try again.';
    todos.value = [];
    total.value = 0;
  }
};

const createTodo = async () => {
  error.value = '';
  try {
    const data = await $fetch<CreateTodoDtoFront>('/api/todos', {
      baseURL: '<http://localhost:3000>',
      method: 'POST',
      body: newTodo,
    });
    console.log('Todo created with ID:', data.todoId);

    Object.assign(newTodo, { title: '', description: '', dueDate: '' });
    await fetchTodos();
  } catch (e) {
    console.error('Error creating todo:', e);
    error.value = 'Failed to create todo. Please try again.';
  }
};
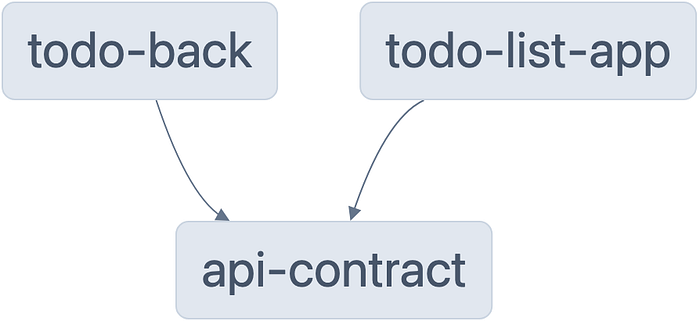
With this setup, nx generates my dependency graph, and we can see that both the backend and frontend depend on my api-contract.
Conclusion
I spent three weeks working on this article, and I assure you I won’t do this every day! Initially, I started writing this article to explore Nx and dive into the world of mono repo. I believe a small team can benefit from this approach to produce faster. However, it’s important to note that it’s not a magical solution. If your technical and product teams have gaps in their skills, transitioning to Nx and a mono repo won’t resolve those issues.
Before considering a switch, assess the state of your teams and explore other actions to help structure their work. In conclusion, I’m glad to have experimented with the monorepo concept, and I plan to continue using it for my projects.